Wednesday, January 27, 2010

Find Closed Browser Tab in Mozilla Firefox.

Most browsers have a History button that you can click on, so you can see which Web Sites your computer has visited even in the past few weeks. We can also view our closed tab by using this history facility (If we forget to bookmark or an accident of fire cut).

If you check the history button after you know that there has been Internet activity and find it empty, you can be sure that whoever was using the computer was doing something wrong and has erased their tracks. Once the browser history has been erased, it is almost impossible for the average user to find out what has been done on the Internet.

How we can show browser history or closed tabs by using Mozilla Firefox Browser?
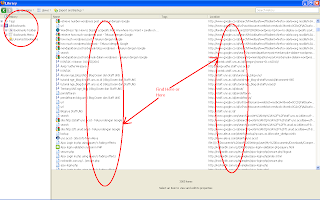
The way is very simple. Just Click History | Show All History or Keyboard Combination CTRL + SHIFT + H. If You can find only by click History, that just because the tab recently closed. But if you can't find by click History, just call Show All History by Keyboard Combination CTRL + SHIFT + H.


Find Closed Browser Tab, Closed Tab Mozilla Firefox, Browser History, Adult Site Checked, Fire Cut

Tuesday, January 26, 2010

Special Post

Mail Merge With Microsoft Word and MySQL

Capture Banyak Frame Image dari File Video

Warp Effect With Photoshop

Embed a Skew Image with Vanishing Point Photoshop Filter

Rezize Foto Satu Folder dengan Powertoy Image Resizer

Menghemat Pengeluaran Pencetakan Pas Foto 2x3, 3x4 dan 4x6

Image Slideshow with Google Picasa Web Album


Complete The Mail Merge and Then Print

The Last Step is Complete The Mail Merge and Then Print it.

Follow this steps

1. Click Complete The Mail Merge.


2. Edit Individual Letter (We can edit individually letter by letter if we want any changes)


3. Click All (All Pages Will be Shown)


4. View Your Letter Again, If no mistakes, Let's Print It.


That was step by step to create Mail Merge With Microsoft Word and MySQL

Preview The Microsoft Word 2007 and MySQL Database Mail Merge

After The Configuration, now let's review our Mail Merge. I Think our Mail Merge is special because unusual because it combines Microsoft Word 2007 and MySQL Database Mail Merge. I see usually we create mail merge from Microsoft Word and Microsoft Excel.

Now let's preview our  Microsoft Word 2007 and MySQL Database Mail Merge.


See the difference from three images below:


 Figure 1. For People 1

 
 Figure 2. For People 2


 Figure 3. For People 3


We already know that same task made we so boring. How about write 1000 letters with different Names and Units..? Use Copy Paste..? No...!!! that was an uneffective way!!


Do by Mail Merge !!!!


Ok, lets go to the Final Step. Complete The Mail Merge

Create Letter Template for Microsoft Word and MySQL Server Mail Merge

As we know, The template is important in Mail Merge. We make the letter template in Microsoft Word. Later this template can produce a variation data from the database (we use MySQL Server as Mail Merge data source).

OK, let just do our next step to create Letter Template for Microsoft Word.


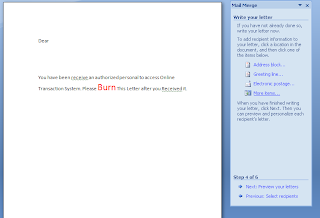
1. Create the letter by manually type the word we need. We can also use Formatting Text in this Template.


2. Choose the source of data by click More Items


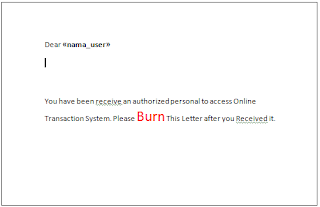
3. Put the Cursor at the right place to put the Data on letter, and then insert Field from the Table by click Insert.


5. Result of the Inserted Field


6. Fix your template by add neccesary field.
7. The Final Result of the Mail merge Template:


Next Step : Preview the Mail Merge Final Result.

Step By Step Mail Merge Wizard on Microsoft Office 2007

Open The Mail merge Wizard by click Mailings -- Start Mail Merge -- Step by Step Mail merge Wizard.


2. Choose the Letter Size, Let's just choose Letters Size, then Click Next.


3. How we set up our letters? Just Use Current Document, then Click Next.


4. Open a database or Data Source. Click Browse.


6. Choose a new source. We must prepare / make a DSN to connect to MySQL database that become the source of data. We have do that step, Now just click New Source.


7. Choose the other Data Connection.


8.Choose Microsoft OLE DB Provider for ODBC Driver


9. Choose The DSN. We use DSN named User in this example.


10. Test the Connection.


11. Click OK at Data Link Window at Step 9. Now configure the table.


12. Save DSN Configuration


13. View Example Data, You also can edit if any  mistakes.


OK, Configuration about Source of Data have finished. Now Write the Letter to make Mail Merge.

Create New DSN for Microsoft Word and MySQL Server Mail Merge

As Previous Post about Create a MySQl Data Source Name for a Database Programming in Windows XP

we can do it fast now
1. click Start -- Control Panel -- Administrative Tools -- Data Source (ODBC))
2. Double Click Data Source and You will find existing data sources.
3. Click Add New Data Source

    MySQl Data Source Name

    4. Be sure You have install MySQL ODBC Connector, The indicator if you have install is a MySQL ODBC Driver in a list like below.
    MySQl Data Source Name

    5. Click Finish, You will then Fill a form with MySQL user account, Give DSN Name an it's description. Be sure input Server, User and Password. Leave Port as Default.

    Fill in the form. In the last step, if you correct, The list of Database will be shown. We will use a table named user on database named belanja. Fisrt, we just choose the database to make the DSN, like example below.

    I Assume this was an Example, Just Pick Up an Example Database that have a Flat Table (Table that has no Relationship)


    Just Click Ok. Now You Already have a Data Source Name.The DSN was named User.


    We can move to Next Steps on Mail Merge With Microsoft Word and MySQL.

    Mail Merge With Microsoft Word and MySQL Part 1

    Part 1 Introduction

    What is Mail Merge ?

    Mail Merge is a software product that uses a file (or database) of names and addresses, together with a template document, to produce multiple copies of a letter, each personally addressed to a different recipient.

    A Mail Merge is also a method of taking data from a database, spreadsheet, or other form of structured data, and inserting it into documents such as letters, mailing labels, and name tags. It usually requires two files, one storing the variable data to be inserted, and the other containing the information that will be the same for each result of the mail merge and the instructions for formatting the variable data.

    You use mail merge when you want to create a set of documents that are essentially the same but where each document contains unique elements. For example, in a letter that announces a new product, your company logo and the text about the product will appear in each letter, and the address and greeting line will be different in each letter.

    You can also print a set of mailing labels or envelopes by doing a mail merge. For labels, for example, you would construct a source document containing the addresses of the people you wish to print labels for and a main document that controls where each person's name, address, city, state, and zip code will go on the label. The main document would also contain information about how many labels are on a page, the size of each label, the size of the sheet of paper the labels are attached to, and what kind of printer you will use to print the labels. Running a mail merge with the two files results in a set of labels, one for each entry in the source document, with each label formatted according to the information in the main document.

    Most major word processing packages, including Microsoft Word and Corel WordPerfect, are capable of performing a mail merge.

    That was introduction from many reference about mail merge. In this special posting we will learn how to make a simple example of mail merge.by using Microsoft Word and MySQL Database Management System. Microsoft Word has a function as the mail merge template provider and MySQL Database as a the data storage provider.

    Next Step
    Part 2. Create New DSN for Microsoft Word and MySQL Server Mail Merge

    Part 3. Step By Step Mail Merge Wizard on Microsoft Office 2007
    Part 4. Create Mail Merge Template Letter
    Part 5. Testing The Letter as Mail merge 
    Part 6. Complete The Mail Merge and Then Print

    Monday, January 25, 2010

    Copy MySQL Table By User Interface Easily With SQL Yog

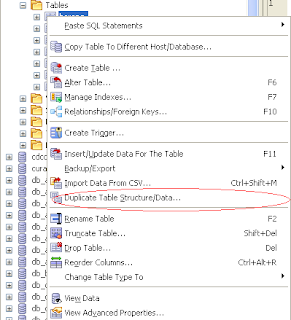
    We can Copy MySQL Table By User Interface Easily With SQL Yog. Usually we do this to Backup Table Without make it into SQL or CSV file.

    How we can make a Copy of MySQL Table By User Interface Easily With SQL Yog. Follow the simple steps below:

    1. Right Click on a table. and Click Duplicate Table Structure / Data

    MySQL Table, MySQL User Interface, SQL Yog

    2. On popup window, configure The Copy Table Name, Options, and Field List.

    MySQL Table, MySQL User Interface, SQL Yog
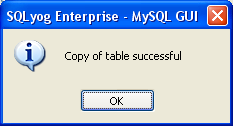
    3. Done and Finish
    MySQL Table, MySQL User Interface, SQL Yog

    4. Result
    MySQL Table, MySQL User Interface, SQL Yog

    Saturday, January 23, 2010

    Embed a Skew Image with Vanishing Point Photoshop Filter

    This Tutorial Show How to Embed a Skew Image with Vanishing Point Photoshop Filter. It was a simple way to do, but we must know the Vanishing Point Photoshop Filter technique.

    We need a Skew Image Source and  a Image Embed File to complete this Tutorial. Below I show original image and it's result.

    Skew Image, Vanishing Point, Photoshop Filter
    Figure 1. Original Image

    Skew Image, Vanishing Point, Photoshop Filter
    Figure 2. Result Image

    This Tutorial Using Vanishing Point Photoshop Filter, and will be explain step by step as Follow

    1. Open Original Image and also The Embed Image
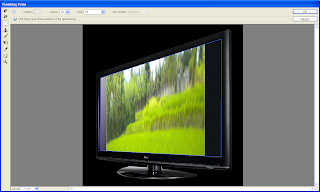
    2. On Original Image, Click Filter --> Vanishing Point, You will get a window like Figure 3.


    Skew Image, Vanishing Point, Photoshop Filter
     Figure 3. Vanishing Point Window

    3. By The Default, The Vanishing Point Have Create Panel Tool Selected, Now Draw The Point, It was easy by click. Just made 4 Point cover the TV Inside Screen by 4 Click. You will get result as Figure 4 below.


    Skew Image, Vanishing Point, Photoshop Filter

    Skew Image, Vanishing Point, Photoshop Filter

    Figure 3. Ceate Vanishing Point

    5. After that Click OK. Come back to the Embed Image, Select All By Shortcut CTRL + A, You will get as Figure 4 Below.
    Skew Image, Vanishing Point, Photoshop Filter
    Figure 4. Select the Embed Image
    6. Copy By CTRL+C
    7. Back to The TV Image, Click Filter --> Vanishing Point Again.
    8. Paste The Embed Image There
    Skew Image, Vanishing Point, Photoshop Filter
    Figure 5. Paste the Embed Image

    9. Drag the embed Image into match position or position that you want.


    Skew Image, Vanishing Point, Photoshop Filter
     Figure 6. Drag the Embed Image Into Vanishing Point

    10. Use also Transform Tool To Get Better Result. Click OK if Finish

    Skew Image, Vanishing Point, Photoshop Filter 

     Figure 6. Transform the Embed Image

    11. And Finally the Result as Follow. The Skew Image On The Original Image.


    Skew Image, Vanishing Point, Photoshop Filter

    That was the technique, you can do a more expressive way to get better image result using Vanishing Point Photoshop Filter.
    Friday, January 22, 2010

    Replace a Spesific Color using Hue / Saturation in Photoshop

    Many technique to replace color in photoshop. One way we can Replace a Spesific Color is by using Hue / Saturation. Replace a Spesific Color is by using Hue / Saturation is a Simple way to do.

    Please View Original and Result Image Below
    Hue / Saturation, Color Replace, Photoshop
    Figure 1. Original Image

    Hue / Saturation, Color Replace, Photoshop

    Figure 2. Result Image

    How we Replace a Spesific Color using Hue / Saturation in Photoshop ..? Follow This Steps
    1. Open an Image
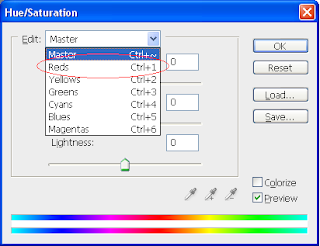
    2. Click Image-Adjustment-Hue/Saturation
    3. Choose A Color That You Want to Replace By Choose an Item in the Combo box.
    Hue / Saturation, Color Replace, Photoshop
    4. Example here, we want to replace Red Color, Please See Example Below

    Hue / Saturation, Color Replace, Photoshop


    5. You will get this Result.

    Hue / Saturation, Color Replace, Photoshop

      The Result Image hasn't have Red Color.